Monday, July 30
Sybase Unwired Platform or SUP
With sybase unwired platform, developers can develop mobile enterprise applications using which businesses can connect to organizational data anytime and anywhere (provided mobile network is available hehe...)
Sybase unwired platform can help you create robust mobile applications of various sizes. The development environment that it provides is highly adaptable and supports all major mobile devices. MSC Mobile company has partnered with Sybase to deliver mobile business solutions to million of users. Using SUP you can connect to various backend systems.
To remember and to understand the power of SUP, 4 Cs are described
Connect : Use graphical modeling of mobile business objects to connect to various traditional databases including SAP, connect to web services etc.
Create : Use simple development environment of the Sybase unwired platform to enable your developers to develop enterprise grade applications and lightweight web applications etc.
Consume : Enable business users to consume mobile applications of devices like blackberry, iOS, windows mobile and Android.
Control : The SUP ensures that your data is in your control by applying various security mechanisms, data encryption etc.
Thursday, July 19
Context menu in a dialog program page4...
go to page3 of this post...


Double
click on each and paste below code respectively.
FORM on_ctmenu_TEXT1 USING l_menu TYPE REF TO cl_ctmenu.
CREATE OBJECT right_clk.
CALL METHOD: right_clk->add_function
EXPORTING fcode = 'REPLACE'
text = 'REPLACE',
right_clk->add_function
EXPORTING fcode = 'CLEAR'
text = 'CLEAR',
right_clk->add_function
EXPORTING fcode = 'ZOOM'
text = 'ZOOM',
right_clk->add_function
EXPORTING fcode = 'CALM DOWN'
text = 'CALM DOWN',
l_menu->add_submenu
EXPORTING menu = right_clk
text = 'OPTIONS'.
ENDFORM."RIGHT CLICK on text 2 input/ouput field
FORM on_ctmenu_TEXT2 USING l_menu TYPE REF TO cl_ctmenu.
CREATE OBJECT right_clk.
CALL METHOD: right_clk->add_function
EXPORTING fcode = 'REPLACE'
text = 'REPLACE',
right_clk->add_function
EXPORTING fcode = 'CLEAR'
text = 'CLEAR',
right_clk->add_function
EXPORTING fcode = 'ZOOM'
text = 'ZOOM',
right_clk->add_function
EXPORTING fcode = 'CALM DOWN'
text = 'CALM DOWN',
l_menu->add_submenu
EXPORTING menu = right_clk
text = 'OPTIONS'.
ENDFORM.
Save and activate the entire programCREATE OBJECT right_clk.
CALL METHOD: right_clk->add_function
EXPORTING fcode = 'REPLACE'
text = 'REPLACE',
right_clk->add_function
EXPORTING fcode = 'CLEAR'
text = 'CLEAR',
right_clk->add_function
EXPORTING fcode = 'ZOOM'
text = 'ZOOM',
right_clk->add_function
EXPORTING fcode = 'CALM DOWN'
text = 'CALM DOWN',
l_menu->add_submenu
EXPORTING menu = right_clk
text = 'OPTIONS'.
ENDFORM.

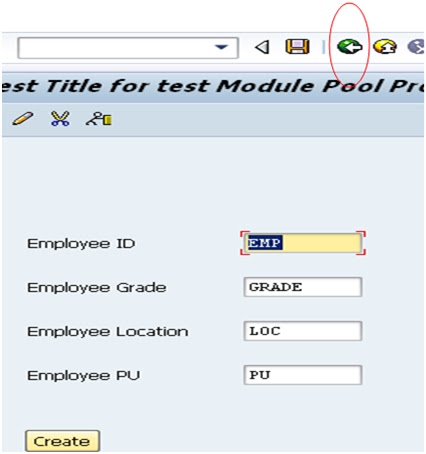
Create
a transaction, execute it to see below output.

Place
the cursor on an input field, Click on Shift+F10 to see the context menu.

Choose
options from the context menu to see and play with the output for yourself.
Enjoy !!!
Context menu is a dialog program page3...
go to page2 of this post...
From the left pane of UI elements, select Box and create a rectangle on the middle area of screen painter as shown below


From the left pane of UI elements, select Box and create a rectangle on the middle area of screen painter as shown below

Then create two input fields within the box.
Enter various properties of each input field. Properties for Input field1 are
shown in below screen shot.

After
adding the two input fields, layout of the screen will look like shown below.

After
adding the two input fields, layout of the screen will look like shown below.

Now go
to flow logic of screen 9000. Uncomment the commented lines (Module status_9000
and module user command 9000).
Double
click on Module_status_9000 and write below code.
prog = sy-repid.
SET PF-STATUS 'ZGUI_9000'.
SET TITLEBAR 'TITLE'.
SET PF-STATUS 'ZGUI_9000'.
SET TITLEBAR 'TITLE'.
Double
click on Module USER_COMMAND_9000
and write below code.
CLEAR OK_CODE.
OK_CODE = SY-UCOMM.
CASE OK_CODE
.
WHEN 'REPLACE'.
TEXT1 = 'TEXT REPLACED'.
WHEN 'CLEAR'.
CLEAR text1.
when 'ZOOM'.
LOOP AT SCREEN.
SCREEN-INTENSIFIED = 1.
SCREEN-COLOR = 1111.
MODIFY SCREEN.
EXIT.
ENDLOOP.
when 'CALM DOWN'.
SCREEN-INTENSIFIED = '0'.
LOOP AT SCREEN.
IF SCREEN-NAME = '9000'.
SCREEN-INTENSIFIED = '0'.
MODIFY SCREEN.
EXIT.
ENDIF.
ENDLOOP.
when 'EXIT'.
LEAVE TO SCREEN 0.
ENDCASE.
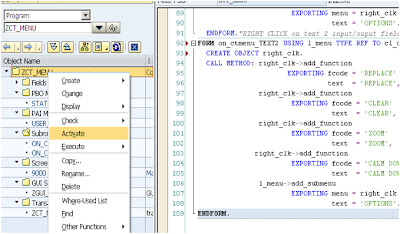
In
order to populate the context menu, we need to write below code in forms we
already declared above in the menu painter. You will see 2 subroutines already
created in the tree structure of the Program.
Context menu in a dialog program page2...
You can switch between the tabs called attributes, element list and flow logic. Element list and flow logic tabs are currently empty as shown below


It has
only two statements called PROCESS BEFORE OUTPUT and PROCESS AFTER INPUT. The
meaning of these two statements is explained below
There
are several events in ABAP which handle fields of a screen. Most important of
these events are Process after input and Process before output. The statements
which need to be executed before activating the screen are written within the
PBO event. The statements which need to be executed after user interaction
should be written within the PAI module or event.
Click on the Layout link circled red above.
Following screen painter tool will be opened.

Friday, July 6
Step by step BDC tutorial
In
this tutorial, we are going to write a BDC program.
What
is a BDC program ?
BDC
programs are executable ABAP programs which are used to transfer data from
legacy system to SAP system. These are used during SAP implementation projects.
In a
SAP system data can be created in database tables using transactions for
example VA01 is used to create material master, FK01 is used to create vendor
master etc.
In BDC
program we just automate the process of execution of a transaction which
updates the database. In order to automate the process of execution of a
transaction, we first record it. Recording is done using SHDC transaction. Once
recording is done, we create a program which collects data from external source
in an internal table. Then the recording is looped over. Hence mass data is
updated in the database.
Scenario: using transaction
“ZTEST_CREATE”, a record can be created
in database table ZZ26EMPL. We are going to upload data in table ZZ26EMPL from
an excel file using BDC program.

Database table ZZ26EMPL

Note:
the above table contains only one record currently.
BDC
step by step
Step1: Start transaction “SHDB”.
Already existing recordings will be displayed to you. Click on “new recording”
located at top left corner.

Enter recording name and the name of the
transaction to be recorded in below screen.

Step
2: Click
on start recording. Below screen will be displayed.

Enter some test data as shown below and click on
the “create” button.

When
you click on the “create” button, a message called “Saved” will appear on the
message bar.
With
this, we are done with the steps we wanted to record. Now click on the back
button as marked in below screen.
Step
3: Click
on back button on the ZTEST_CREATE transaction, you will be taken to SHDB where
you will be shown a kind of log of the steps you performed in your ZTEST_CREATE
transaction.

Click on save and back on this screen and you
will see below screen

Step
4: Select
our recording ie ZREC_ZZEMP and click on the program button encircled red in
the above screen. As soon as you click on program button, you are asked to
enter the program name on below screen

Also you are asked to select file contents,
select “Transfer from recording” radio button here. Click ok. You will be asked
to enter program attributes, do so as shown below.

Click on the “Source Code” button shown at
bottom right in the above screen. As soon as you click on the “source code”
button, you are taken to the ABAP editor where you can edit the BDC program
generated for you based on the recording done.

As
a result of the above BDC program, we need to upload 4 fields named “EMPID”,
“GRADE”, “LOCATION”, “PU” in the database table “ZZ26EMPL”.
Step
A: Create an internal table which contains 4 fields mentioned above. Create
this internal table just after the statement INCLUDE BDCRECX1.
Step
B: Call function “UPLOAD” after START_OF_SELECTION statement.
STEP
C: Apply loop at the above created internal table after PERFORM OPEN_GROUP
statement. End the loop before the statement PERFORM CLOSE_GROUP.
STEP
D: Replace constants appearing in perform statements the loop. Replace them by
the values from internal table.
The
code after performing above A,B,C,D steps is shown below.
report ZPROG_ZZEMP
no standard page heading line-size 255.
include bdcrecx1.
DATA : BEGIN OF ITAB OCCURS 0,
EMPID(10) TYPE C,
GRADE(10) TYPE C,
LOCATION(10) TYPE C,
pu(10) TYPE C,
END OF ITAB.
start-of-selection.
CALL FUNCTION 'UPLOAD'
EXPORTING
FILENAME = 'C:\'
FILETYPE = 'ASC'
TABLES
data_tab = ITAB.
perform open_group.
LOOP AT ITAB.
perform bdc_dynpro using 'ZTEST_MODPOOL' '1000'.
perform bdc_field using 'BDC_CURSOR'
'ZZ26EMPL-PU'.
perform bdc_field using 'BDC_OKCODE'
'=V_CREATE'.
perform bdc_field using 'ZZ26EMPL-EMPID'
ITAB-EMPID.
perform bdc_field using 'ZZ26EMPL-GRADE'
ITAB-GRADE.
perform bdc_field using 'ZZ26EMPL-LOCATION'
ITAB-LOCATION.
perform bdc_field using 'ZZ26EMPL-PU'
ITAB-PU.
perform bdc_transaction using 'ZTEST_CREATE'.
ENDLOOP.
perform close_group.
Step
5: Activate
and execute the program. Below screen will appear.

Select “Call transaction” radio button and
execute. Below popup will appear. You are supposed to select a file from your
local machine which contains data to be uploaded into SAP database table “ZZ26EMPL”.

Create Excel
file to be uploaded into SAP system
Before
we can go ahead, we need to create a file on our local machine which to hold
data to be uploaded on the SAP system. For this we need to know the number of
fields to be uploaded, their sequence as used in the BDC recording and the
length of each field.
We
already know the number of fields, their sequence as we did recording by
ourselves. Now in order to know the length of each field, go to SE11 and punch
in the table name “ZZ26EMPL”.

The
above screen clearly indicates that each field is 10 character long.
Now
create an excel file and enter data as shown below.
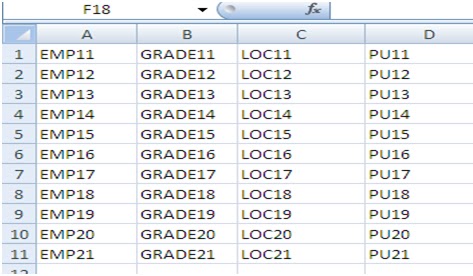
Select cells and right click and select “Format
Cells”. Format all the cells as text.


Next set the width of each column as 10, since
we know that each column is 10 characters long.


Save it as Formatted Text(Comma delimited) file.
Name it “Test ”

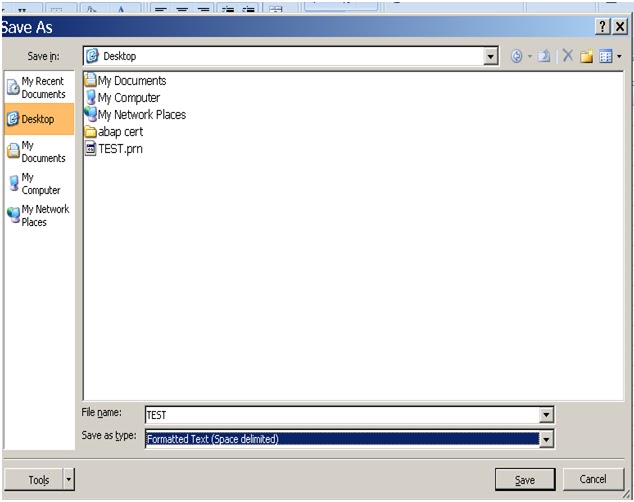
Once you save it as formatted text(space
delimited) file, it gets saved on the specified location as a .prn file. We are
going to upload this file to SAP system using our BDC program.
Step 6: Now
go to SAP again and select the file you just created above.

Click on the transfer button. Following log will
be displayed to you. Just ignore it and check you database table to see whether
the entries you had done in the excel file are actually uploaded in to the
database table “ZZ26EMPL”.


You will see that, yes the data from excel file
is now uploaded into SAP
Wednesday, July 4
Step by Step Module pool program
Step1: Go to
transaction SE38, create a program named “ZTEST_MODPOOL”. Enter, necessary
attributes of the program as shown in
below screenshot.
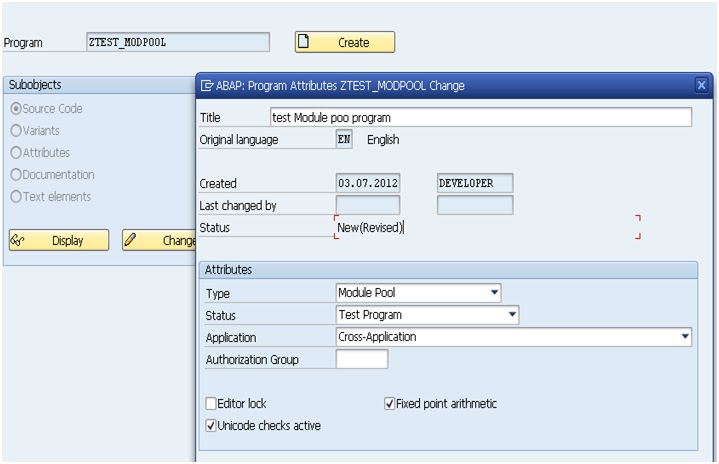
Click Save. Below popup asks you to save the program in a
package so that it can be transported to other systems within the system
landscape. But since this is a test and
a learning program, save it as a local object. You won’t be able to transport
it further. For this, simple click on the “Local Object” button on below popup.

Step2: Create a
Screen, number it 1000. You can number it anything. I am numbering it as 1000.


Step3:
Create
2 includes name them as written below
1) ZTEST_MODPOOL_001-
for PBO Module
2) ZTEST_MODPOOL_002
– for PAI Module

Save the include also as a local object. Once you
create an include as local object, you will see below information popup. It
indicates that ZTEST_MODPOOL is a our main program and includes
ZTEST_MODPOOL_001 and ZTEST_MODPOOL_002 will be inserted in the main program.
Select OK or tick mark on below popup.

Double click on screen 1000 from within the program
hierarchy shown on left side of the screen.

Uncomment the commented lines from Screen 1000’s flow
logic. Please note that each screen has 3 tabs; Attributes, Element List and
Flow logic. Once you uncomment Module
STATUS_1000 and Module User_Command_1000 statements,
the screen looks like below.

Step4:
Double
click on STATUS_1000. We are now
going to create the PBO Module of our Module pool program. As soon as you
double click on STATUS_001, system will show below popup and will ask you to
create PBO Module. Select Yes on below popup.

When you create PBO Module, system asks you to
associate necessary includes to the PBO module. We had created 2 includes in
our program; ZTEST_MODPOOL_001 and ZTEST_MODPOOL _002 . Associate the ZTEST_MODPOOL_001 with this PBO
Module. You can do this in below popup.

PBO Module will look like below. Uncomment the Include
statement, SET PF-STATUS and SET TITLEBAR statements. Give some name to PF
STATUS and TITLEBAR.

After un commenting, PBO Module will look like below.

Step5:
Double
click on “TESTSTATUS” and “TESTTITLEBAR” texts in the above screen. Following
screen will appear.

Define your program’s status below using below graphic
environment for defining menu bar, application toolbar and function keys. This
graphic environment is self explanatory. The
“+” icons in each can be drilled down to open the options available to
define Manu, Application toolbar and function keys etc.

Example status Bar of a standard SAP Screen is shown
below.
For example, I have created 5 items; one, two, three,
four and five in the menu bar as shown below. Also I created 4 items on the
application toolbar namely A, B, C and D. With each, application toolbar item,
a text and a function key can be
associated.

Double click on the application toolbar items one by one,
above popup will appear. Choose “Static text” radio button and click OK.
Following popup will appear. Enter function text and icon etc.. Click OK.

Save and your program’s status will be created. Now
it’s the time to create the Title Bar. Double click on the “TESTTITLEBAR” text
in the Code of include we created above. Below popup will appear. Click OK.
This will save the interface of our Module pool program.

Step6: Now let us
create layout of the screen 1000.
From
within the tree structure of program ZTEST_MODPOOL, double click on screen
1000, following screen appears. On below screen click on “layout”, encircled
red.
As soon as you click on the layout link mentioned above, screen painter tool starts.

Step7:
Create
4 input/output fields and 3 pushbuttons as shown above. When you double click
on an element, following properties popup appears where you can define
properties of the UI element.

I clicked on first I/O element and the above popup
appeared. I entered name of the element as ZZ26EMPL-EMPID. ZZ26EMPL is a custom
table created by me which has 4 fields as shown below. Similarly we need to
define the “Name” property of each I/O field on the screen. The four fields
will be used for the input and output of the 4 fields of ZZ26EMPL table.

Step8: Next, we
need to create 3 pushbuttons on the screen; Create, Display and Change. Double
click on each button and define the following properties for each push button :
Name, text and FctCode. For our example, I have given
following values to these properties of pushbuttons.
Name : CREATE
text: Create
FctCode: V_CREATE
FctType: none
Name : CHANGE
text: Change FctCode: V_CHANGE FctType: none
Name
: DISPLAY text: Display FctCode:
V_DISPLAY FctType: none
We are going to use the FctCode in PAI Module of our
program. IT is worth to notice here that Module pool programs have 2 type of
Modules called PBO Module and PAI Module. PBO is executed before the output can
be displayed to the user. PAI is executed after the user has entered input and
interacted with the Screen.
Step9: Double
click on screen 1000, you see below screen.
Double click on the PBO module ie STATUS_1000. You
will taken to below screen. The code that is written in below screen is
available in text format below the screen shot. Simply copy the code to your
STATUS_1000 Module and save the changes.

PBO Code :
SET PF-STATUS 'TESTSTATUS'.
SET TITLEBAR 'TESTTITLEBAR'.
LOOP AT SCREEN.
CASE screen-name.
WHEN 'CHANGE'.
IF sy-tcode NE 'ZTEST_CHANGE'.
screen-invisible = 1.
MODIFY SCREEN.
ELSE.
screen-invisible = 0.
MODIFY SCREEN.
ENDIF.
WHEN 'CREATE'.
IF sy-tcode NE 'ZTEST_CREATE'.
screen-invisible = 1.
MODIFY SCREEN.
ELSE.
screen-invisible = 0.
MODIFY SCREEN.
ENDIF.
WHEN 'DISPLAY'.
IF sy-tcode NE 'ZTEST_DISPLAY'.
screen-invisible = 1.
MODIFY SCREEN.
ELSE.
screen-invisible = 0.
MODIFY SCREEN.
ENDIF.
ENDCASE.
ENDLOOP.
Step10: Go
back and double click on the PAI Module ie USER_COMMAND_1000, following screen will appear.SET TITLEBAR 'TESTTITLEBAR'.
LOOP AT SCREEN.
CASE screen-name.
WHEN 'CHANGE'.
IF sy-tcode NE 'ZTEST_CHANGE'.
screen-invisible = 1.
MODIFY SCREEN.
ELSE.
screen-invisible = 0.
MODIFY SCREEN.
ENDIF.
WHEN 'CREATE'.
IF sy-tcode NE 'ZTEST_CREATE'.
screen-invisible = 1.
MODIFY SCREEN.
ELSE.
screen-invisible = 0.
MODIFY SCREEN.
ENDIF.
WHEN 'DISPLAY'.
IF sy-tcode NE 'ZTEST_DISPLAY'.
screen-invisible = 1.
MODIFY SCREEN.
ELSE.
screen-invisible = 0.
MODIFY SCREEN.
ENDIF.
ENDCASE.
ENDLOOP.

PAI Code :
tables : ZZ26EMPL.
data : WA_ZZ26EMPL TYPE Zz26EMPL.
CASE sy-ucomm.
WHEN 'V_CREATE'.
WA_ZZ26EMPL-EMPID = ZZ26EMPL-EMPID.
WA_ZZ26EMPL-GRADE = ZZ26EMPL-GRADE.
WA_ZZ26EMPL-LOCATION = ZZ26EMPL-LOCATION.
WA_ZZ26EMPL-PU = ZZ26EMPL-PU.
* INSERT ZZ26EMPL FROM WA_ZZ26EMPL.
MODIFY ZZ26EMPL FROM WA_ZZ26EMPL.
if sy-subrc eq 0.
MESSAGE 'Saved' TYPE 'S'.
endif.
WHEN 'V_CHANGE'.
WA_ZZ26EMPL-EMPID = ZZ26EMPL-EMPID.
WA_ZZ26EMPL-GRADE = ZZ26EMPL-GRADE.
WA_ZZ26EMPL-LOCATION = ZZ26EMPL-LOCATION.
WA_ZZ26EMPL-PU = ZZ26EMPL-PU.
MODIFY ZZ26EMPL FROM WA_ZZ26EMPL.
MESSAGE 'Updated' TYPE 'S'.
WHEN 'V_DISPLAY'.
SELECT EMPID GRADE LOCATION PU
FROM ZZ26EMPL
INTO CORRESPONDING FIELDS OF WA_ZZ26EMPL
WHERE EMPID = ZZ26EMPL-EMPID.
ZZ26EMPL-EMPID = WA_ZZ26EMPL-EMPID.
ZZ26EMPL-GRADE = WA_ZZ26EMPL-GRADE.
ZZ26EMPL-LOCATION = WA_ZZ26EMPL-LOCATION.
ZZ26EMPL-PU = WA_ZZ26EMPL-PU.
CALL SCREEN '1000'.
ENDSELECT.
WHEN 'EXIT'.
LEAVE PROGRAM.
ENDCASE.
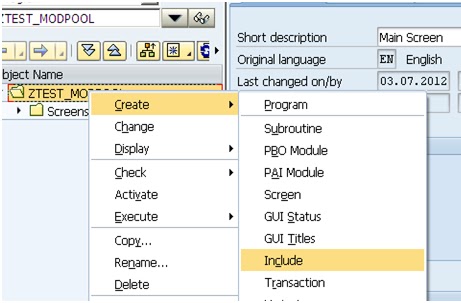
Step11: Create
3 transactions, one each for create, change and display. This can be done in SE80. Right click on the
project ZTEST_MODPOOL and choose create->transaction as shown belowdata : WA_ZZ26EMPL TYPE Zz26EMPL.
CASE sy-ucomm.
WHEN 'V_CREATE'.
WA_ZZ26EMPL-EMPID = ZZ26EMPL-EMPID.
WA_ZZ26EMPL-GRADE = ZZ26EMPL-GRADE.
WA_ZZ26EMPL-LOCATION = ZZ26EMPL-LOCATION.
WA_ZZ26EMPL-PU = ZZ26EMPL-PU.
* INSERT ZZ26EMPL FROM WA_ZZ26EMPL.
MODIFY ZZ26EMPL FROM WA_ZZ26EMPL.
if sy-subrc eq 0.
MESSAGE 'Saved' TYPE 'S'.
endif.
WHEN 'V_CHANGE'.
WA_ZZ26EMPL-EMPID = ZZ26EMPL-EMPID.
WA_ZZ26EMPL-GRADE = ZZ26EMPL-GRADE.
WA_ZZ26EMPL-LOCATION = ZZ26EMPL-LOCATION.
WA_ZZ26EMPL-PU = ZZ26EMPL-PU.
MODIFY ZZ26EMPL FROM WA_ZZ26EMPL.
MESSAGE 'Updated' TYPE 'S'.
WHEN 'V_DISPLAY'.
SELECT EMPID GRADE LOCATION PU
FROM ZZ26EMPL
INTO CORRESPONDING FIELDS OF WA_ZZ26EMPL
WHERE EMPID = ZZ26EMPL-EMPID.
ZZ26EMPL-EMPID = WA_ZZ26EMPL-EMPID.
ZZ26EMPL-GRADE = WA_ZZ26EMPL-GRADE.
ZZ26EMPL-LOCATION = WA_ZZ26EMPL-LOCATION.
ZZ26EMPL-PU = WA_ZZ26EMPL-PU.
CALL SCREEN '1000'.
ENDSELECT.
WHEN 'EXIT'.
LEAVE PROGRAM.
ENDCASE.

Enter transaction code, short text, program name,
screen number and check all the 3 checkboxes of GUI support in below screen and
save.

Transaction ZTEST_DISPLAY will be created. Save the
transaction as local object. Similarly create the other two transactions;
ZTEST_CREATE and ZTEST_CHANGE.
Step12: Time to
Execute…………….!
Right
click on the ZTEST_CREATE transaction and select Execute->Direct processing.
Following screen which we created using the screen painter tool will be shown.
Enter values in 4 fields as shown below and click on the Create button.
If the creation of record is successful, a message
called “Saved” will be displayed in the message bar as shown below.

Now We need to retrieve the data we just inserted in
the database table “ZZ26EMPL”. So Execute the transaction ZTEST_DISPLAY. Following
screen will be shown. Enter EMPID ie “test1” in the first input field.

Click on display. Other data for the EMPID “test1”
will be fetched from table “ZZ26EMPL” as shown below.

Subscribe to:
Posts (Atom)