Wednesday, July 4
Step by Step Module pool program
Step1: Go to
transaction SE38, create a program named “ZTEST_MODPOOL”. Enter, necessary
attributes of the program as shown in
below screenshot.
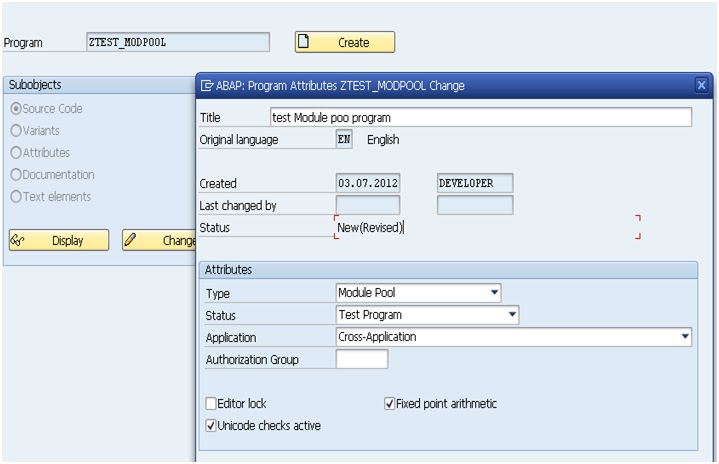
Click Save. Below popup asks you to save the program in a
package so that it can be transported to other systems within the system
landscape. But since this is a test and
a learning program, save it as a local object. You won’t be able to transport
it further. For this, simple click on the “Local Object” button on below popup.

Step2: Create a
Screen, number it 1000. You can number it anything. I am numbering it as 1000.


Step3:
Create
2 includes name them as written below
1) ZTEST_MODPOOL_001-
for PBO Module
2) ZTEST_MODPOOL_002
– for PAI Module

Save the include also as a local object. Once you
create an include as local object, you will see below information popup. It
indicates that ZTEST_MODPOOL is a our main program and includes
ZTEST_MODPOOL_001 and ZTEST_MODPOOL_002 will be inserted in the main program.
Select OK or tick mark on below popup.

Double click on screen 1000 from within the program
hierarchy shown on left side of the screen.

Uncomment the commented lines from Screen 1000’s flow
logic. Please note that each screen has 3 tabs; Attributes, Element List and
Flow logic. Once you uncomment Module
STATUS_1000 and Module User_Command_1000 statements,
the screen looks like below.

Step4:
Double
click on STATUS_1000. We are now
going to create the PBO Module of our Module pool program. As soon as you
double click on STATUS_001, system will show below popup and will ask you to
create PBO Module. Select Yes on below popup.

When you create PBO Module, system asks you to
associate necessary includes to the PBO module. We had created 2 includes in
our program; ZTEST_MODPOOL_001 and ZTEST_MODPOOL _002 . Associate the ZTEST_MODPOOL_001 with this PBO
Module. You can do this in below popup.

PBO Module will look like below. Uncomment the Include
statement, SET PF-STATUS and SET TITLEBAR statements. Give some name to PF
STATUS and TITLEBAR.

After un commenting, PBO Module will look like below.

Step5:
Double
click on “TESTSTATUS” and “TESTTITLEBAR” texts in the above screen. Following
screen will appear.

Define your program’s status below using below graphic
environment for defining menu bar, application toolbar and function keys. This
graphic environment is self explanatory. The
“+” icons in each can be drilled down to open the options available to
define Manu, Application toolbar and function keys etc.

Example status Bar of a standard SAP Screen is shown
below.
For example, I have created 5 items; one, two, three,
four and five in the menu bar as shown below. Also I created 4 items on the
application toolbar namely A, B, C and D. With each, application toolbar item,
a text and a function key can be
associated.

Double click on the application toolbar items one by one,
above popup will appear. Choose “Static text” radio button and click OK.
Following popup will appear. Enter function text and icon etc.. Click OK.

Save and your program’s status will be created. Now
it’s the time to create the Title Bar. Double click on the “TESTTITLEBAR” text
in the Code of include we created above. Below popup will appear. Click OK.
This will save the interface of our Module pool program.

Step6: Now let us
create layout of the screen 1000.
From
within the tree structure of program ZTEST_MODPOOL, double click on screen
1000, following screen appears. On below screen click on “layout”, encircled
red.
As soon as you click on the layout link mentioned above, screen painter tool starts.

Step7:
Create
4 input/output fields and 3 pushbuttons as shown above. When you double click
on an element, following properties popup appears where you can define
properties of the UI element.

I clicked on first I/O element and the above popup
appeared. I entered name of the element as ZZ26EMPL-EMPID. ZZ26EMPL is a custom
table created by me which has 4 fields as shown below. Similarly we need to
define the “Name” property of each I/O field on the screen. The four fields
will be used for the input and output of the 4 fields of ZZ26EMPL table.

Step8: Next, we
need to create 3 pushbuttons on the screen; Create, Display and Change. Double
click on each button and define the following properties for each push button :
Name, text and FctCode. For our example, I have given
following values to these properties of pushbuttons.
Name : CREATE
text: Create
FctCode: V_CREATE
FctType: none
Name : CHANGE
text: Change FctCode: V_CHANGE FctType: none
Name
: DISPLAY text: Display FctCode:
V_DISPLAY FctType: none
We are going to use the FctCode in PAI Module of our
program. IT is worth to notice here that Module pool programs have 2 type of
Modules called PBO Module and PAI Module. PBO is executed before the output can
be displayed to the user. PAI is executed after the user has entered input and
interacted with the Screen.
Step9: Double
click on screen 1000, you see below screen.
Double click on the PBO module ie STATUS_1000. You
will taken to below screen. The code that is written in below screen is
available in text format below the screen shot. Simply copy the code to your
STATUS_1000 Module and save the changes.

PBO Code :
SET PF-STATUS 'TESTSTATUS'.
SET TITLEBAR 'TESTTITLEBAR'.
LOOP AT SCREEN.
CASE screen-name.
WHEN 'CHANGE'.
IF sy-tcode NE 'ZTEST_CHANGE'.
screen-invisible = 1.
MODIFY SCREEN.
ELSE.
screen-invisible = 0.
MODIFY SCREEN.
ENDIF.
WHEN 'CREATE'.
IF sy-tcode NE 'ZTEST_CREATE'.
screen-invisible = 1.
MODIFY SCREEN.
ELSE.
screen-invisible = 0.
MODIFY SCREEN.
ENDIF.
WHEN 'DISPLAY'.
IF sy-tcode NE 'ZTEST_DISPLAY'.
screen-invisible = 1.
MODIFY SCREEN.
ELSE.
screen-invisible = 0.
MODIFY SCREEN.
ENDIF.
ENDCASE.
ENDLOOP.
Step10: Go
back and double click on the PAI Module ie USER_COMMAND_1000, following screen will appear.SET TITLEBAR 'TESTTITLEBAR'.
LOOP AT SCREEN.
CASE screen-name.
WHEN 'CHANGE'.
IF sy-tcode NE 'ZTEST_CHANGE'.
screen-invisible = 1.
MODIFY SCREEN.
ELSE.
screen-invisible = 0.
MODIFY SCREEN.
ENDIF.
WHEN 'CREATE'.
IF sy-tcode NE 'ZTEST_CREATE'.
screen-invisible = 1.
MODIFY SCREEN.
ELSE.
screen-invisible = 0.
MODIFY SCREEN.
ENDIF.
WHEN 'DISPLAY'.
IF sy-tcode NE 'ZTEST_DISPLAY'.
screen-invisible = 1.
MODIFY SCREEN.
ELSE.
screen-invisible = 0.
MODIFY SCREEN.
ENDIF.
ENDCASE.
ENDLOOP.

PAI Code :
tables : ZZ26EMPL.
data : WA_ZZ26EMPL TYPE Zz26EMPL.
CASE sy-ucomm.
WHEN 'V_CREATE'.
WA_ZZ26EMPL-EMPID = ZZ26EMPL-EMPID.
WA_ZZ26EMPL-GRADE = ZZ26EMPL-GRADE.
WA_ZZ26EMPL-LOCATION = ZZ26EMPL-LOCATION.
WA_ZZ26EMPL-PU = ZZ26EMPL-PU.
* INSERT ZZ26EMPL FROM WA_ZZ26EMPL.
MODIFY ZZ26EMPL FROM WA_ZZ26EMPL.
if sy-subrc eq 0.
MESSAGE 'Saved' TYPE 'S'.
endif.
WHEN 'V_CHANGE'.
WA_ZZ26EMPL-EMPID = ZZ26EMPL-EMPID.
WA_ZZ26EMPL-GRADE = ZZ26EMPL-GRADE.
WA_ZZ26EMPL-LOCATION = ZZ26EMPL-LOCATION.
WA_ZZ26EMPL-PU = ZZ26EMPL-PU.
MODIFY ZZ26EMPL FROM WA_ZZ26EMPL.
MESSAGE 'Updated' TYPE 'S'.
WHEN 'V_DISPLAY'.
SELECT EMPID GRADE LOCATION PU
FROM ZZ26EMPL
INTO CORRESPONDING FIELDS OF WA_ZZ26EMPL
WHERE EMPID = ZZ26EMPL-EMPID.
ZZ26EMPL-EMPID = WA_ZZ26EMPL-EMPID.
ZZ26EMPL-GRADE = WA_ZZ26EMPL-GRADE.
ZZ26EMPL-LOCATION = WA_ZZ26EMPL-LOCATION.
ZZ26EMPL-PU = WA_ZZ26EMPL-PU.
CALL SCREEN '1000'.
ENDSELECT.
WHEN 'EXIT'.
LEAVE PROGRAM.
ENDCASE.
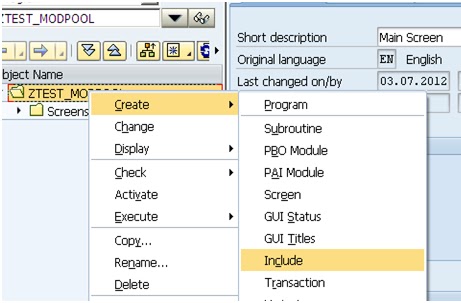
Step11: Create
3 transactions, one each for create, change and display. This can be done in SE80. Right click on the
project ZTEST_MODPOOL and choose create->transaction as shown belowdata : WA_ZZ26EMPL TYPE Zz26EMPL.
CASE sy-ucomm.
WHEN 'V_CREATE'.
WA_ZZ26EMPL-EMPID = ZZ26EMPL-EMPID.
WA_ZZ26EMPL-GRADE = ZZ26EMPL-GRADE.
WA_ZZ26EMPL-LOCATION = ZZ26EMPL-LOCATION.
WA_ZZ26EMPL-PU = ZZ26EMPL-PU.
* INSERT ZZ26EMPL FROM WA_ZZ26EMPL.
MODIFY ZZ26EMPL FROM WA_ZZ26EMPL.
if sy-subrc eq 0.
MESSAGE 'Saved' TYPE 'S'.
endif.
WHEN 'V_CHANGE'.
WA_ZZ26EMPL-EMPID = ZZ26EMPL-EMPID.
WA_ZZ26EMPL-GRADE = ZZ26EMPL-GRADE.
WA_ZZ26EMPL-LOCATION = ZZ26EMPL-LOCATION.
WA_ZZ26EMPL-PU = ZZ26EMPL-PU.
MODIFY ZZ26EMPL FROM WA_ZZ26EMPL.
MESSAGE 'Updated' TYPE 'S'.
WHEN 'V_DISPLAY'.
SELECT EMPID GRADE LOCATION PU
FROM ZZ26EMPL
INTO CORRESPONDING FIELDS OF WA_ZZ26EMPL
WHERE EMPID = ZZ26EMPL-EMPID.
ZZ26EMPL-EMPID = WA_ZZ26EMPL-EMPID.
ZZ26EMPL-GRADE = WA_ZZ26EMPL-GRADE.
ZZ26EMPL-LOCATION = WA_ZZ26EMPL-LOCATION.
ZZ26EMPL-PU = WA_ZZ26EMPL-PU.
CALL SCREEN '1000'.
ENDSELECT.
WHEN 'EXIT'.
LEAVE PROGRAM.
ENDCASE.

Enter transaction code, short text, program name,
screen number and check all the 3 checkboxes of GUI support in below screen and
save.

Transaction ZTEST_DISPLAY will be created. Save the
transaction as local object. Similarly create the other two transactions;
ZTEST_CREATE and ZTEST_CHANGE.
Step12: Time to
Execute…………….!
Right
click on the ZTEST_CREATE transaction and select Execute->Direct processing.
Following screen which we created using the screen painter tool will be shown.
Enter values in 4 fields as shown below and click on the Create button.
If the creation of record is successful, a message
called “Saved” will be displayed in the message bar as shown below.

Now We need to retrieve the data we just inserted in
the database table “ZZ26EMPL”. So Execute the transaction ZTEST_DISPLAY. Following
screen will be shown. Enter EMPID ie “test1” in the first input field.

Click on display. Other data for the EMPID “test1”
will be fetched from table “ZZ26EMPL” as shown below.

Subscribe to:
Post Comments (Atom)
SUPPOSE HERE WE CREATE POPUP THEN WHAT CODE SHOULD WRITE TO SAVE THE POPUP DATA
ReplyDelete