Friday, July 6
Step by step BDC tutorial
In
this tutorial, we are going to write a BDC program.
What
is a BDC program ?
BDC
programs are executable ABAP programs which are used to transfer data from
legacy system to SAP system. These are used during SAP implementation projects.
In a
SAP system data can be created in database tables using transactions for
example VA01 is used to create material master, FK01 is used to create vendor
master etc.
In BDC
program we just automate the process of execution of a transaction which
updates the database. In order to automate the process of execution of a
transaction, we first record it. Recording is done using SHDC transaction. Once
recording is done, we create a program which collects data from external source
in an internal table. Then the recording is looped over. Hence mass data is
updated in the database.
Scenario: using transaction
“ZTEST_CREATE”, a record can be created
in database table ZZ26EMPL. We are going to upload data in table ZZ26EMPL from
an excel file using BDC program.

Database table ZZ26EMPL

Note:
the above table contains only one record currently.
BDC
step by step
Step1: Start transaction “SHDB”.
Already existing recordings will be displayed to you. Click on “new recording”
located at top left corner.

Enter recording name and the name of the
transaction to be recorded in below screen.

Step
2: Click
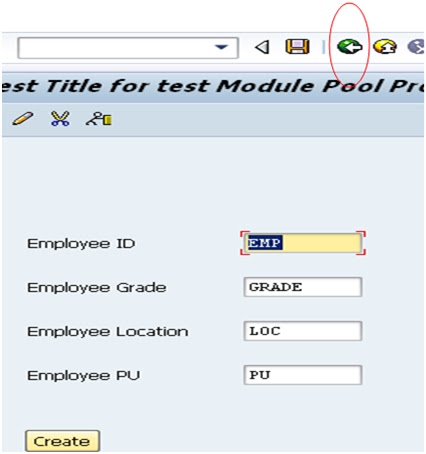
on start recording. Below screen will be displayed.

Enter some test data as shown below and click on
the “create” button.

When
you click on the “create” button, a message called “Saved” will appear on the
message bar.
With
this, we are done with the steps we wanted to record. Now click on the back
button as marked in below screen.
Step
3: Click
on back button on the ZTEST_CREATE transaction, you will be taken to SHDB where
you will be shown a kind of log of the steps you performed in your ZTEST_CREATE
transaction.

Click on save and back on this screen and you
will see below screen

Step
4: Select
our recording ie ZREC_ZZEMP and click on the program button encircled red in
the above screen. As soon as you click on program button, you are asked to
enter the program name on below screen

Also you are asked to select file contents,
select “Transfer from recording” radio button here. Click ok. You will be asked
to enter program attributes, do so as shown below.

Click on the “Source Code” button shown at
bottom right in the above screen. As soon as you click on the “source code”
button, you are taken to the ABAP editor where you can edit the BDC program
generated for you based on the recording done.

As
a result of the above BDC program, we need to upload 4 fields named “EMPID”,
“GRADE”, “LOCATION”, “PU” in the database table “ZZ26EMPL”.
Step
A: Create an internal table which contains 4 fields mentioned above. Create
this internal table just after the statement INCLUDE BDCRECX1.
Step
B: Call function “UPLOAD” after START_OF_SELECTION statement.
STEP
C: Apply loop at the above created internal table after PERFORM OPEN_GROUP
statement. End the loop before the statement PERFORM CLOSE_GROUP.
STEP
D: Replace constants appearing in perform statements the loop. Replace them by
the values from internal table.
The
code after performing above A,B,C,D steps is shown below.
report ZPROG_ZZEMP
no standard page heading line-size 255.
include bdcrecx1.
DATA : BEGIN OF ITAB OCCURS 0,
EMPID(10) TYPE C,
GRADE(10) TYPE C,
LOCATION(10) TYPE C,
pu(10) TYPE C,
END OF ITAB.
start-of-selection.
CALL FUNCTION 'UPLOAD'
EXPORTING
FILENAME = 'C:\'
FILETYPE = 'ASC'
TABLES
data_tab = ITAB.
perform open_group.
LOOP AT ITAB.
perform bdc_dynpro using 'ZTEST_MODPOOL' '1000'.
perform bdc_field using 'BDC_CURSOR'
'ZZ26EMPL-PU'.
perform bdc_field using 'BDC_OKCODE'
'=V_CREATE'.
perform bdc_field using 'ZZ26EMPL-EMPID'
ITAB-EMPID.
perform bdc_field using 'ZZ26EMPL-GRADE'
ITAB-GRADE.
perform bdc_field using 'ZZ26EMPL-LOCATION'
ITAB-LOCATION.
perform bdc_field using 'ZZ26EMPL-PU'
ITAB-PU.
perform bdc_transaction using 'ZTEST_CREATE'.
ENDLOOP.
perform close_group.
Step
5: Activate
and execute the program. Below screen will appear.

Select “Call transaction” radio button and
execute. Below popup will appear. You are supposed to select a file from your
local machine which contains data to be uploaded into SAP database table “ZZ26EMPL”.

Create Excel
file to be uploaded into SAP system
Before
we can go ahead, we need to create a file on our local machine which to hold
data to be uploaded on the SAP system. For this we need to know the number of
fields to be uploaded, their sequence as used in the BDC recording and the
length of each field.
We
already know the number of fields, their sequence as we did recording by
ourselves. Now in order to know the length of each field, go to SE11 and punch
in the table name “ZZ26EMPL”.

The
above screen clearly indicates that each field is 10 character long.
Now
create an excel file and enter data as shown below.
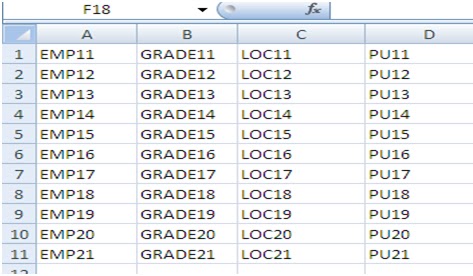
Select cells and right click and select “Format
Cells”. Format all the cells as text.


Next set the width of each column as 10, since
we know that each column is 10 characters long.


Save it as Formatted Text(Comma delimited) file.
Name it “Test ”

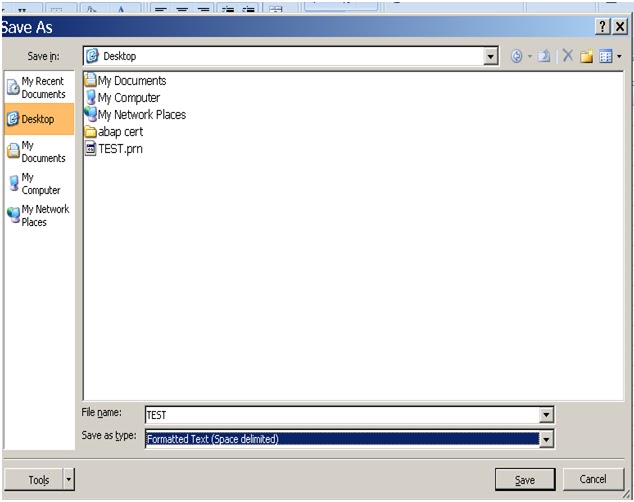
Once you save it as formatted text(space
delimited) file, it gets saved on the specified location as a .prn file. We are
going to upload this file to SAP system using our BDC program.
Step 6: Now
go to SAP again and select the file you just created above.

Click on the transfer button. Following log will
be displayed to you. Just ignore it and check you database table to see whether
the entries you had done in the excel file are actually uploaded in to the
database table “ZZ26EMPL”.


You will see that, yes the data from excel file
is now uploaded into SAP
Subscribe to:
Post Comments (Atom)
No comments:
Post a Comment
You are welcome to express your views here...