Showing posts with label Dialog Program. Show all posts
Showing posts with label Dialog Program. Show all posts
Thursday, July 19
Context menu in a dialog program page4...
go to page3 of this post...
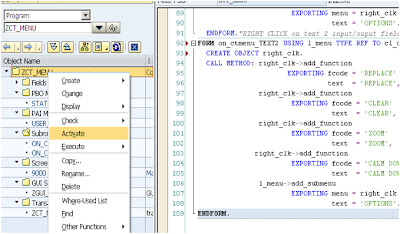


Double
click on each and paste below code respectively.
FORM on_ctmenu_TEXT1 USING l_menu TYPE REF TO cl_ctmenu.
CREATE OBJECT right_clk.
CALL METHOD: right_clk->add_function
EXPORTING fcode = 'REPLACE'
text = 'REPLACE',
right_clk->add_function
EXPORTING fcode = 'CLEAR'
text = 'CLEAR',
right_clk->add_function
EXPORTING fcode = 'ZOOM'
text = 'ZOOM',
right_clk->add_function
EXPORTING fcode = 'CALM DOWN'
text = 'CALM DOWN',
l_menu->add_submenu
EXPORTING menu = right_clk
text = 'OPTIONS'.
ENDFORM."RIGHT CLICK on text 2 input/ouput field
CREATE OBJECT right_clk.
CALL METHOD: right_clk->add_function
EXPORTING fcode = 'REPLACE'
text = 'REPLACE',
right_clk->add_function
EXPORTING fcode = 'CLEAR'
text = 'CLEAR',
right_clk->add_function
EXPORTING fcode = 'ZOOM'
text = 'ZOOM',
right_clk->add_function
EXPORTING fcode = 'CALM DOWN'
text = 'CALM DOWN',
l_menu->add_submenu
EXPORTING menu = right_clk
text = 'OPTIONS'.
ENDFORM."RIGHT CLICK on text 2 input/ouput field
FORM on_ctmenu_TEXT2 USING l_menu TYPE REF TO cl_ctmenu.
CREATE OBJECT right_clk.
CALL METHOD: right_clk->add_function
EXPORTING fcode = 'REPLACE'
text = 'REPLACE',
right_clk->add_function
EXPORTING fcode = 'CLEAR'
text = 'CLEAR',
right_clk->add_function
EXPORTING fcode = 'ZOOM'
text = 'ZOOM',
right_clk->add_function
EXPORTING fcode = 'CALM DOWN'
text = 'CALM DOWN',
l_menu->add_submenu
EXPORTING menu = right_clk
text = 'OPTIONS'.
ENDFORM.
Save and activate the entire programCREATE OBJECT right_clk.
CALL METHOD: right_clk->add_function
EXPORTING fcode = 'REPLACE'
text = 'REPLACE',
right_clk->add_function
EXPORTING fcode = 'CLEAR'
text = 'CLEAR',
right_clk->add_function
EXPORTING fcode = 'ZOOM'
text = 'ZOOM',
right_clk->add_function
EXPORTING fcode = 'CALM DOWN'
text = 'CALM DOWN',
l_menu->add_submenu
EXPORTING menu = right_clk
text = 'OPTIONS'.
ENDFORM.

Create
a transaction, execute it to see below output.

Place
the cursor on an input field, Click on Shift+F10 to see the context menu.

Choose
options from the context menu to see and play with the output for yourself.
Enjoy !!!

Context menu in a dialog program page2...
You can switch between the tabs called attributes, element list and flow logic. Element list and flow logic tabs are currently empty as shown below


It has
only two statements called PROCESS BEFORE OUTPUT and PROCESS AFTER INPUT. The
meaning of these two statements is explained below
There
are several events in ABAP which handle fields of a screen. Most important of
these events are Process after input and Process before output. The statements
which need to be executed before activating the screen are written within the
PBO event. The statements which need to be executed after user interaction
should be written within the PAI module or event.
Click on the Layout link circled red above.
Following screen painter tool will be opened.

Sunday, July 1
Context menu in a dialog program page1...
Below tutorial will explain step by step process
of adding a context menu to input fields in a dialog program.
Go to transaction SE38. Create a program named
“ZCT_MENU”.


In the
next screen, enter title, Type, Status and Application of the program. These
are called attributes of the program being created.


Enter
package name if you want to transport this to next system in your system
landscape ie quality, production etc. If you do not want to transport, let $TMP
be the package and click on Local Object button.


As
soon as you click on the local object button, Program ZCT_MENU is created and
following screen appears.


Right
Click on Object name “ZCT_MENU” and create a screen.


Let
9000 be its screen number.


With
this, you are into Screen Painter. The screen number is 9000 as give by us in
the above popup. Enter short description of the screen as “Main Screen”. Keep
the other attributes as it is. Do not change them. BY default screen type will
be normal type.

Subscribe to:
Posts (Atom)