Saturday, September 1
WebDynPro for ABAP Training
WebDynPro for ABAP Training
Training Course Content
Introduction
- Introduction to Web & Netweaver
- Technologies
- Introduction to WebDynPro for ABAP
- WebDynPro Architecture
- WebDynPro components
- View
- Window
- Controller-Context
- Event-Action
Interfaces of WebDynPro –components
WebDynPro Application
WebDynPro Application
WebDynPro: Development in detail
WebDynPro view
- UI Elements of the view
- Structure of the view Context
- Data Binding
- UI Element Actions
- Action Event Handlers
- Component Controller
- Context mapping
- Programming controller methods
- Methods of the local controller interface
- Events & event Handlers
- Cross Controller method call
- WebDynPro Runtime APIS
- Filling the context
WebDynPro window
- Navigation between two views
WebDynPro application
- URL of a WebDynPro application
- Full Qualified domain names (FQDN)
- URLs and Namespaces
- Calling a WebDynPro Application using
- Parameters
Controller of a WebDynPro Component
- Component Usages
- Navigation through window Plugs
- Cross-Component Context mapping
- Creating a WebDynPro component interface
- definition
- Implementing a WebDynPro interface
- definition
- Dynamic Programming
- Dynamically creating component usages
Advanced concepts
- Working with the assistance Class
- Service call in a WebDynPro application
- Creating a service call
- Messages
- free Enhancements
- Debugging WebDynPro ABAP applications
- Version comparisons in WebDynPro for ABAP
- File export
- Working with dialog boxes
- Input help
- Integrating a PDF form in a WebDynPro Application
- SAP list viewer in WebDynPro for ABAP
- Integration of ALV in your Application
- Select-Option in WebDynPro for ABAP
WebDynPro Trace Tool
- ICM Tracing
- Http browser tracing
WebDynPro Tools in the ABAP workbench - Controller Editor
- View Editor
Window Editor - WebDynPro application
- The WebDynPro code Wizard
Dynpro Controls
- Checkbox
- Frame
- I/O field
- Pushbutton
- Radio button
- Sub screen
- Table Control, Tab Strip
- Tex Field
Abstract UI Element Interfaces
- Interactive Form
- Business Graphics Library
- Contextual Panel
- Horizontal Contextual Panel
- File download, File upload
- Formatted Text view
- I frame
- Link to Action
- Link to URL
- Text edit
- Text view’
- Link
- Menu
- Toolbar
- Button Row
- Roadmap
Runtime APIs
- IF_WD_ACTION
- IF_WD_APPLICATION
- IF_WD_COMPONENT
- IF_WD_COMPONENT_USAGE
- IF_WD_CONTROLLER
- IF_WD_MESSAGE_MANAGER
- IF_WD_VALIDATION
- IF_WD_VIEW
- IF_WD_VIEW_CONTROLLER
- IF_WD_VIEW_ELEMENTS
- IF_WD_WINDOW
- IF_WD_WINDOW_CONTROLLER
- IF_WD_WINDOWMANAGER
- CL_WD_CUSTOM_EVENT
- IF_WD_CONTEXT
- IF_WD_CONTEXT_NODE
- IF_WD_CONTEXT_NODE_INFO
- IF_WD_CONTEXT_ELEMENT
Context APIs
PERSONALIZATION APIS
- IF_WD_PERSONALIZATION
SERVICE CLASSES
- CL_WD_CONTEXT SERVICES
- CL_WD_RUNTIME_SERVICES
- CL_WD_UTILITIES

Monday, July 30
Sybase Unwired Platform or SUP
With sybase unwired platform, developers can develop mobile enterprise applications using which businesses can connect to organizational data anytime and anywhere (provided mobile network is available hehe...)
Sybase unwired platform can help you create robust mobile applications of various sizes. The development environment that it provides is highly adaptable and supports all major mobile devices. MSC Mobile company has partnered with Sybase to deliver mobile business solutions to million of users. Using SUP you can connect to various backend systems.
To remember and to understand the power of SUP, 4 Cs are described
Connect : Use graphical modeling of mobile business objects to connect to various traditional databases including SAP, connect to web services etc.
Create : Use simple development environment of the Sybase unwired platform to enable your developers to develop enterprise grade applications and lightweight web applications etc.
Consume : Enable business users to consume mobile applications of devices like blackberry, iOS, windows mobile and Android.
Control : The SUP ensures that your data is in your control by applying various security mechanisms, data encryption etc.
Thursday, July 19
Context menu in a dialog program page4...
go to page3 of this post...
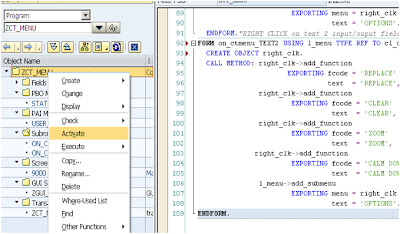


Double
click on each and paste below code respectively.
FORM on_ctmenu_TEXT1 USING l_menu TYPE REF TO cl_ctmenu.
CREATE OBJECT right_clk.
CALL METHOD: right_clk->add_function
EXPORTING fcode = 'REPLACE'
text = 'REPLACE',
right_clk->add_function
EXPORTING fcode = 'CLEAR'
text = 'CLEAR',
right_clk->add_function
EXPORTING fcode = 'ZOOM'
text = 'ZOOM',
right_clk->add_function
EXPORTING fcode = 'CALM DOWN'
text = 'CALM DOWN',
l_menu->add_submenu
EXPORTING menu = right_clk
text = 'OPTIONS'.
ENDFORM."RIGHT CLICK on text 2 input/ouput field
CREATE OBJECT right_clk.
CALL METHOD: right_clk->add_function
EXPORTING fcode = 'REPLACE'
text = 'REPLACE',
right_clk->add_function
EXPORTING fcode = 'CLEAR'
text = 'CLEAR',
right_clk->add_function
EXPORTING fcode = 'ZOOM'
text = 'ZOOM',
right_clk->add_function
EXPORTING fcode = 'CALM DOWN'
text = 'CALM DOWN',
l_menu->add_submenu
EXPORTING menu = right_clk
text = 'OPTIONS'.
ENDFORM."RIGHT CLICK on text 2 input/ouput field
FORM on_ctmenu_TEXT2 USING l_menu TYPE REF TO cl_ctmenu.
CREATE OBJECT right_clk.
CALL METHOD: right_clk->add_function
EXPORTING fcode = 'REPLACE'
text = 'REPLACE',
right_clk->add_function
EXPORTING fcode = 'CLEAR'
text = 'CLEAR',
right_clk->add_function
EXPORTING fcode = 'ZOOM'
text = 'ZOOM',
right_clk->add_function
EXPORTING fcode = 'CALM DOWN'
text = 'CALM DOWN',
l_menu->add_submenu
EXPORTING menu = right_clk
text = 'OPTIONS'.
ENDFORM.
Save and activate the entire programCREATE OBJECT right_clk.
CALL METHOD: right_clk->add_function
EXPORTING fcode = 'REPLACE'
text = 'REPLACE',
right_clk->add_function
EXPORTING fcode = 'CLEAR'
text = 'CLEAR',
right_clk->add_function
EXPORTING fcode = 'ZOOM'
text = 'ZOOM',
right_clk->add_function
EXPORTING fcode = 'CALM DOWN'
text = 'CALM DOWN',
l_menu->add_submenu
EXPORTING menu = right_clk
text = 'OPTIONS'.
ENDFORM.

Create
a transaction, execute it to see below output.

Place
the cursor on an input field, Click on Shift+F10 to see the context menu.

Choose
options from the context menu to see and play with the output for yourself.
Enjoy !!!
Context menu is a dialog program page3...
go to page2 of this post...
From the left pane of UI elements, select Box and create a rectangle on the middle area of screen painter as shown below


From the left pane of UI elements, select Box and create a rectangle on the middle area of screen painter as shown below

Then create two input fields within the box.
Enter various properties of each input field. Properties for Input field1 are
shown in below screen shot.

After
adding the two input fields, layout of the screen will look like shown below.

After
adding the two input fields, layout of the screen will look like shown below.

Now go
to flow logic of screen 9000. Uncomment the commented lines (Module status_9000
and module user command 9000).
Double
click on Module_status_9000 and write below code.
prog = sy-repid.
SET PF-STATUS 'ZGUI_9000'.
SET TITLEBAR 'TITLE'.
SET PF-STATUS 'ZGUI_9000'.
SET TITLEBAR 'TITLE'.
Double
click on Module USER_COMMAND_9000
and write below code.
CLEAR OK_CODE.
OK_CODE = SY-UCOMM.
CASE OK_CODE
.
WHEN 'REPLACE'.
TEXT1 = 'TEXT REPLACED'.
WHEN 'CLEAR'.
CLEAR text1.
when 'ZOOM'.
LOOP AT SCREEN.
SCREEN-INTENSIFIED = 1.
SCREEN-COLOR = 1111.
MODIFY SCREEN.
EXIT.
ENDLOOP.
when 'CALM DOWN'.
SCREEN-INTENSIFIED = '0'.
LOOP AT SCREEN.
IF SCREEN-NAME = '9000'.
SCREEN-INTENSIFIED = '0'.
MODIFY SCREEN.
EXIT.
ENDIF.
ENDLOOP.
when 'EXIT'.
LEAVE TO SCREEN 0.
ENDCASE.
In
order to populate the context menu, we need to write below code in forms we
already declared above in the menu painter. You will see 2 subroutines already
created in the tree structure of the Program.
Context menu in a dialog program page2...
You can switch between the tabs called attributes, element list and flow logic. Element list and flow logic tabs are currently empty as shown below


It has
only two statements called PROCESS BEFORE OUTPUT and PROCESS AFTER INPUT. The
meaning of these two statements is explained below
There
are several events in ABAP which handle fields of a screen. Most important of
these events are Process after input and Process before output. The statements
which need to be executed before activating the screen are written within the
PBO event. The statements which need to be executed after user interaction
should be written within the PAI module or event.
Click on the Layout link circled red above.
Following screen painter tool will be opened.

Subscribe to:
Posts (Atom)